
Ask ChatGPT in the browser to inspect a local project, let Codex on your Windows computer do the work, then bring the result back into the conversation. A local MCP bridge supplies the missing connection: it exposes named job tools, passes tasks to Codex, and records results that the web client can retrieve.
This guide starts with a disposable directory containing two text files. It includes a downloadable server, PowerShell commands and a verification sequence. Local protocol tests and a private ChatGPT tunnel connection are separate checks. The documentation was reviewed on October 4, 2026; account-side setup is not presented as a completed private-account test.
1. Decide what the connection should control
The path is ChatGPT Web → tunnel → local MCP bridge → Codex → project files, with results returned along the same path. The bridge is useful for code analysis, bounded edits and checks. Desktop clicking, browser screenshots and taking over an arbitrary open Codex window require separate capabilities.
The project stays on your computer, while prompts, retrieved code and responses can enter the relevant hosted services. Keeping the MCP listener private does not mean every code snippet remains local. Start by reading a known line from hello.txt so that actual file access can be checked.
2. Check the local environment and account permissions
node --version
codex --version
codex login status
Use a supported Windows machine, Node.js and a signed-in Codex installation. Logged in using ChatGPT identifies the local sign-in method; check it independently of your browser session. Use codex login when necessary. ChatGPT subscription sign-in and API-key sign-in have different usage arrangements. Authentication reference.
Open Platform tunnel settings. Creating or changing a tunnel requires Read + Manage; operating or selecting it requires Read + Use. Developer-mode access is separate. Confirm access before installing a tunnel client. Tunnel prerequisites.
Check subscription usage, Codex authentication and tunnel runtime requirements separately. This setup does not require renting a server, and the guide makes no blanket promise that all usage is free.
3. Use the SDK for the first working bridge
The downloadable example uses the Codex SDK. It exposes six tools: list_projects, start_task, get_task_status, get_task_result, continue_task and cancel_task. Jobs are stored locally in data/jobs.json. Starting a job returns its identifier promptly; later calls retrieve progress and results. SDK reference.
For a durable multi-project service with approvals, use app-server behind the MCP interface. The old codex mcp-server command has been removed; app-server needs an adapter and is not itself a URL you can paste into the plugin directory. App-server reference.
4. Download and install the example
Download the Local Codex MCP example ZIP. Place the extracted files directly in D:\CodexWebBridge. The archive includes the source, dependency lockfile, test client and disposable demo. It excludes credentials, real project configuration, dependencies and job history.
Set-Location 'D:\CodexWebBridge'
npm ci --ignore-scripts
Copy-Item -LiteralPath 'projects.example.json' -Destination 'projects.json'
node --check server.mjs
node smoke-test.mjs
The last command checks MCP initialization, six discovered tools, the project list, invalid jobs and rejected edits. It does not call a model. Expect passed: true and modelRun: false.
This example pins Codex SDK 0.135.0, MCP TypeScript SDK 1.32.0 and Zod 3.25.76. The MCP repository now has a v2 package layout. Follow the lockfile for this example; do not mix v2 imports into these files. SDK version guidance.
5. Register one project with editing disabled
{
  "demo": {
    "path": "./demo-project",
    "writeEnabled": false
  }
}
Project names are resolved from local projects.json. Relative paths use the server directory, and absolute paths are not returned in the project listing. Configuration changes take effect after restart. Start with demo rather than registering an entire drive.
The project list sets the working directory; the Codex sandbox governs execution. Read-only is not a guarantee that the process can read only this project. Review inherited Codex configuration, plugins and MCP integrations. Before connecting valuable projects, use a dedicated non-administrator Windows account with appropriate filesystem access. Windows sandbox guidance.
An isolated Codex configuration directory can make this experiment easier to review. Sign in yourself and start the tunnel from an environment inheriting the same CODEX_HOME. Never include authentication files in the ZIP.
$env:CODEX_HOME = 'D:\CodexWebBridge\codex-home'
codex login
codex login status
6. Verify an actual local read
Set-Location 'D:\CodexWebBridge'
node smoke-test.mjs --run-codex
This test consumes Codex usage. It starts an analyze job through MCP, retrieves its result, checks for Hello from the local demo project., and confirms the file is unchanged. It also checks rejection of a concurrent job in the same project.
A completed turn and a successful task are different observations. An agent can finish normally while reporting that a file could not be read. The test rejects that outcome. Inspect smoke-report.json and data/jobs.json before connecting the tunnel.
Record SDK and executor versions. If Windows reports CreateProcessWithLogonW failed: 267, inspect the working directory and version compatibility, especially a cwd represented as a file:/// URI instead of a native path. Do not hide the error by disabling sandbox protection. Publication-time results are stated in the final section.
If the server reports model is not supported, check the model selector in the local Codex installation under the intended CODEX_HOME. BRIDGE_MODEL can select an available model locally; it is not a remote tool parameter. The publication-time test used gpt-5.5 returned by model/list, not a model guaranteed for every account.
$env:BRIDGE_MODEL = 'gpt-5.5'
node smoke-test.mjs --run-codex
7. Create and run the private tunnel
Create a tunnel in Platform settings, record its tunnel_id and associate the ChatGPT workspace that will use it. Download the Windows build from the settings page or the official latest release. Replace the example executable paths with your installation paths. Tunnel setup reference.
$tunnelExe = 'D:\Tools\tunnel-client\tunnel-client.exe'
& $tunnelExe help quickstart
$secret = Read-Host 'Tunnel runtime API key' -AsSecureString
$env:CONTROL_PLANE_API_KEY = [System.Net.NetworkCredential]::new('', $secret).Password
$tunnelId = Read-Host 'Tunnel ID'
$nodeExe = 'C:\Tools\nodejs\node.exe'
$serverFile = 'D:\CodexWebBridge\server.mjs'
$mcpCommand = '"' + $nodeExe + '" "' + $serverFile + '"'
& $tunnelExe init --sample sample_mcp_stdio_local --profile codex-web --tunnel-id $tunnelId --mcp-command $mcpCommand
& $tunnelExe doctor --profile codex-web --explain
& $tunnelExe run --profile codex-web
The example uses stdio rather than a local HTTP listener. Keep run active; it launches the configured server. Do not launch a second bridge against the same project. Read the current client help for command quoting, particularly installation paths with spaces. Keep stdout reserved for MCP messages and send diagnostics to stderr. The runtime key belongs in the environment, not in server source or project configuration.
8. Inspect tunnel health and install the personal plugin
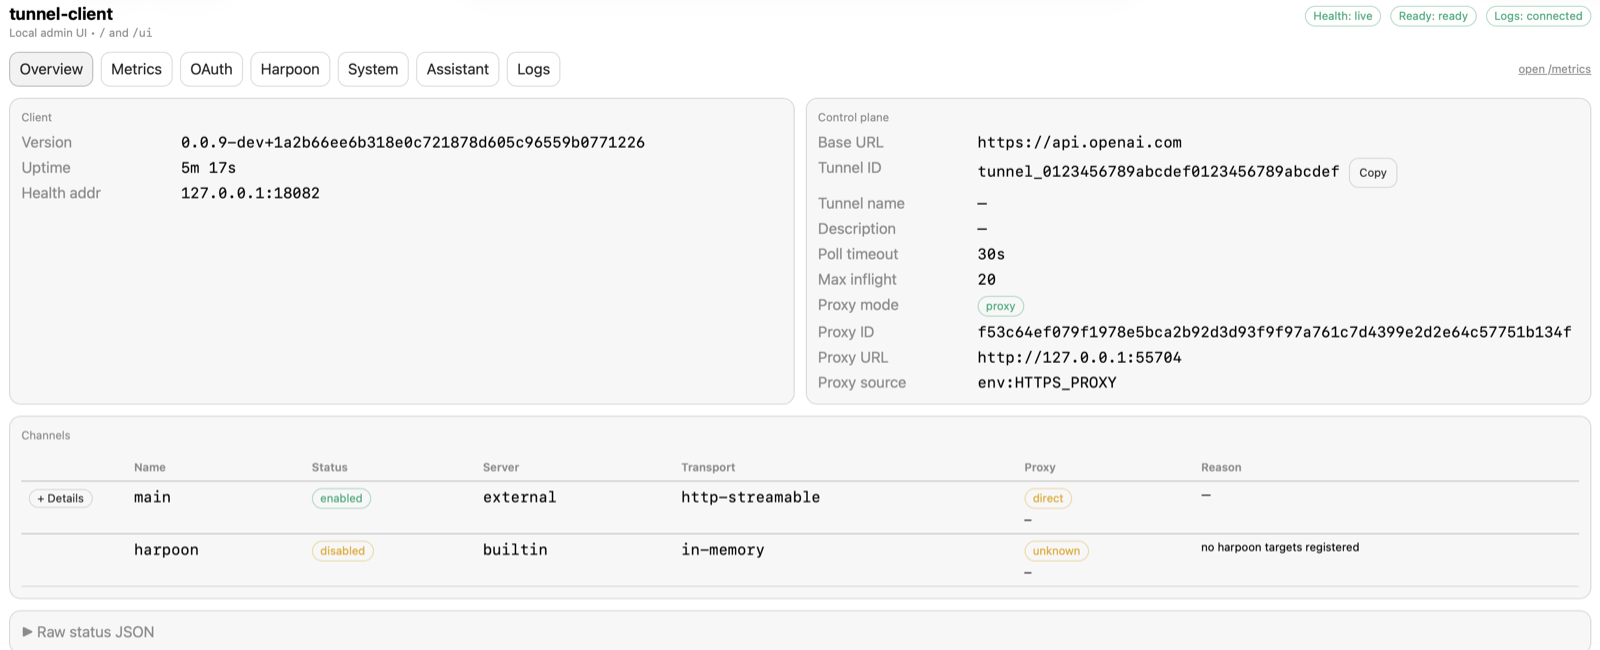
Use the local management URL printed by your tunnel client, then inspect /ui. Ports depend on its actual configuration. Check health, readiness and polling before moving to ChatGPT.
- Open ChatGPT settings and enable Developer mode under Security and login when your account permits it.
- Open ChatGPT Plugins and create Local Codex Bridge.
- Choose Tunnel under Connection. Select your tunnel, or enter its valid identifier where supported.
- Confirm that the six expected tools are discovered.
- Open the personal plugin and complete installation.
- Start a new Work chat and select the plugin with @.
Creation and installation are separate. Labels may change; compare the connection guide and personal-plugin quickstart. This is a private developer-mode connection, not publication in the public plugin marketplace.
9. Verify the first browser request
Use Local Codex Bridge to call list_projects.
Show registered projects and write access. Do not start a job yet.
Call start_task with project=demo and mode=analyze.
Read hello.txt and return its exact text. Do not edit files or use external services.
Keep the returned job_id and use it to retrieve status and results.Verify a real call, the requested project and mode, and the known file content. A description of how to read a file is not evidence that it was read. If the job remains running, report that state and query again later. Local background execution does not guarantee indefinite autonomous polling by the web conversation.
After a verified read, continue_task can ask the same Codex thread to read README.txt. It returns a new job identifier for the next turn. Only completed jobs created by this bridge can be continued.
10. Enable edits in a disposable copy
Prepare a backup or a separate worktree first. Stop the running service and wait for the child executor to stop. Change writeEnabled to true locally, then restart. There is no remote tool for enabling this setting.
{
  "demo": {
    "path": "./demo-project",
    "writeEnabled": true
  }
}
Edit jobs use workspace-write while analyze jobs remain read-only. The example uses approvalPolicy: never, so it does not wait for interactive escalation approval; this is not administrator access. Non-interactive permission guidance.
Use project=demo and mode=edit.
Change only hello.txt to Hello from ChatGPT Web.
Read it back and report the before/after contents and actual check.
Do not install dependencies, use the network, deploy, or change other files.
Inspect the local file and the complete diff afterward. Project names and task instructions do not replace operating-system restrictions. This example serializes jobs only within one process; a production bridge needs cross-process locking or isolated work directories.
11. Treat cancellation, recovery and rollback separately
cancel_task requests cancellation. It does not undo completed edits or external actions. A ten-minute execution limit requests abortion and records timed_out; adjust that limit for longer workflows. After interruption, inspect actual files before submitting another job.
On bridge restart, queued and running records become interrupted and are not automatically retried. A completed task with a saved thread identifier can be continued. Closing the browser does not stop a healthy local worker, but sleep, power loss or process exit can interrupt it.
Preserve existing uncommitted changes when restoring a Git project. Without Git, recover affected files from the task’s backup. Conversation history rollback and filesystem recovery are distinct operations.
12. Extend the bridge with app-server when needed
Keep MCP job tools stable while replacing the SDK worker with an app-server adapter for approvals, live steering and richer thread management. Protocol reference.
- Start app-server locally over stdio and perform initialize followed by initialized.
- Map start_task to thread/start and turn/start with the registered working directory. Save job, thread and turn identifiers.
- Consume events continuously and persist status in SQLite. Status tools read the database rather than blocking on a full turn.
- Store approval requests with their command, directory, scope and expiry. Bind the response to an authenticated human action before responding to the server.
- Use turn/interrupt for cancellation and wait for the terminal event. Use thread/resume and a new turn for continuation.
Do not let the model approve its own request by filling an ordinary approve parameter. A visible approval step needs a verified user decision and a matching live request. Persisted records also do not make a half-executed shell command resumable after power loss.
Add result pagination, cross-process locks and sensitive-output handling. The downloadable example masks a few common token formats; it cannot detect every confidential document or proprietary detail.
13. Diagnose the failing layer
- Local MCP failure: check syntax, dependencies, projects.json and actual directory access. An idle stdio process can be normal.
- Completed turn without the expected result: inspect the answer and actual command outcome. Repair local access before involving the tunnel.
- Healthy tunnel missing in ChatGPT: check Platform organization, workspace association, Use permission and active polling.
- Created plugin absent from chat: complete installation, start a fresh Work chat and select it explicitly. Refresh metadata after tool changes.
- Cancelled job but changed files: inspect the diff and any second bridge process. Cancellation is not restoration.
Do not enter localhost or an app-server WebSocket URL as a public MCP endpoint. Avoid solving a connection problem by weakening authentication or sandbox settings.
14. Verification scope and next exercises
Before publication, all six MCP tools passed protocol checks and a real Codex read returned the known hello.txt line without changing the file. The test used a separate non-sensitive directory because the original workspace explicitly denied sandbox-user reads; those protections were preserved. SDK 0.135.0 was tested with a model returned by model/list. Directory-URI and model-compatibility failures were recorded for troubleshooting. A private tunnel and browser-side editing were not tested.
Protocol checks and the real-file smoke test are recorded separately before publication. Private tunnel creation, plugin installation and browser-side editing must be verified in the reader’s own account and disposable project. The richer app-server approval adapter is an extension design, not an implemented feature hidden in the ZIP.
Keep an inspectable read first, then change one line in a test copy, then move to read-only analysis of a real project. Each added capability should have an observable result.